
After getting my Time Capsule, I’ve now started using Time Machine (TM) to backup my data.
The “image” file TM uses is variable. Upon the creation and first backup; it starts out small (or whatever size the data you’ve just backed up). It does however grow over time as it tries to retain copies of old files as well. So basically the bigger the space it can work with, the further “back in time” you could restore your files as it were.
Now that’s all fine and dandy, but they should really give the user an option to specify how big they allow this image to be. And I’ll explain in a sec why this is something you’d want… as well as how to accomplish it.[1]: http://www.macosxhints.com/article.php?story=20071108020121567 “view hint”
As it is, the TM backup file, being variable, will just keep on eating your hard drive’s free space. In the instance of a 1TB Time Capsule (TC), most of the time, you would want to use the space for stuff other than backing up. Since you cannot partition 1 Or at least partition it without voiding your warranty. the TC, TM will think that you have 1TB available for backup and will just keep on growing that image until it fills whatever free space is in there.
Now we don’t want that do we?
So to solve this, there’s a [procedure you can apply][1]. While that article has everything you need to accomplish it, I’m taking the time to re-post (and expound on) it here because it took me a couple of tries to get it working. You could experience file mounting/locking problems if you do things in a certain order. On one try TM wouldn’t write to the backup image file at all.
So I’ve made this step by step tutorial (with pictures) on how to accomplish that same end result discussed in the mentioned article.
IF/ELSE
If you have a TM image (or have already been using TM), then you can skip this section. If it’s your first time however, this will hopefully be a less painful experience. And you’ll know why in the succeeding sections.
Turn TM on and have it start backing up your files. As soon as you see the this image:
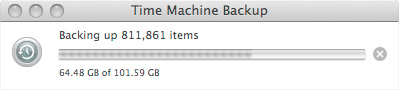
Don’t mind the values in there, as I took the screenshot much later. Basically what you need to make sure of is that it’s past the “preparing” phase and actually has started putting data into the image. If so, then cancel the backup, and let it wrap up with your incomplete backup. Why incomplete? You’ll see.
on second thought…
I thought about it and figured there’s another way to end up with a faster initial backup while letting TM finish properly. Before you start backing up, press the options button on TM preferences.
This should give you the option to exclude files. What I did was exclude absolutely everything save for a single text file, it could be exisiting, or you could create it specifically for this purpose.
If you go this route, you should be able to just let it finish backing up… and proceed to the next section.
STEP 1: Preliminaries
Turn TM off and find where it stored its backup image (usually at the root of the disk/volume which you set it to backup to):

Obviously, the text in red is not the name of the file. The real filename would depend on your situation. For argument’s sake, lets say your computer name is “MyComputer” and your MAC address is 0A:1B:2C:3D:4E:5F, you’d have the filename MyComputer_0a1b2c3d4e5f.sparsebundle
This will also be a good time to check if the image file is mounted – if it is, unmount it.
STEP 2: Creating Alternate Image
Now run Disk Utility.app and click on the New Image icon. You should see something similar to this (less the “custom volume size” dialog box)
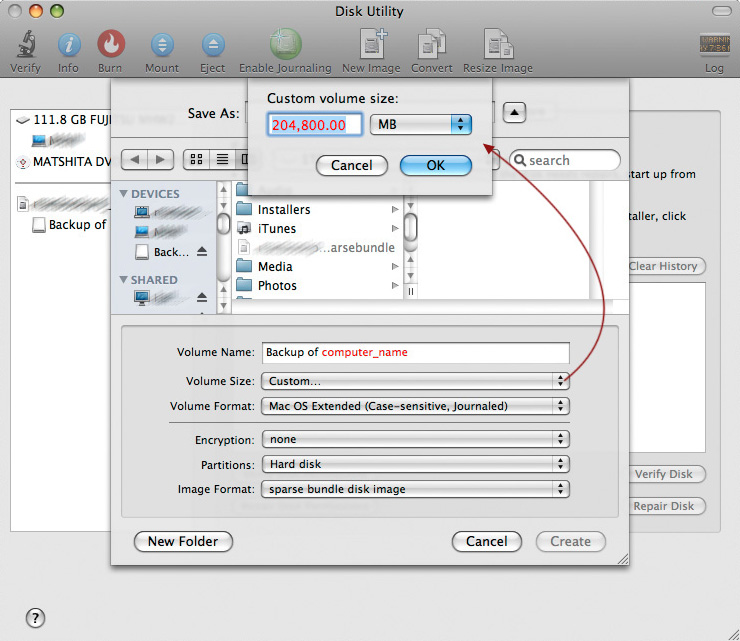
Again, text in red will depend on your situation. But basically, follow all the settings on that picture. Change “computer_name” to your computer’s name (e.g. MyComputer from the previous section). Click on the Volume Size disclosure field and enter the desired size you want. This will now be the maximum size your image will be allowed to grow to.
Enter test.sparsebundle in the Save As field (which is covered by the Custom volume size dialog in the picture). Then press the Create button. Creating the file is not instantaneous, and should take a few moments to do. Once it’s done creating the file, unmount it [if its mounted]; then carry on.
STEP 3: Clone That Shit!
Now it’s time to mount both image files.
Mount MyComputer_0a1b2c3d4e5f.sparsebundle (or whatever the hell name it is)… then mount test.sparsebundle.
Go back to Disk Utility.app and you should see something like this (pay attention to the items on the left side):
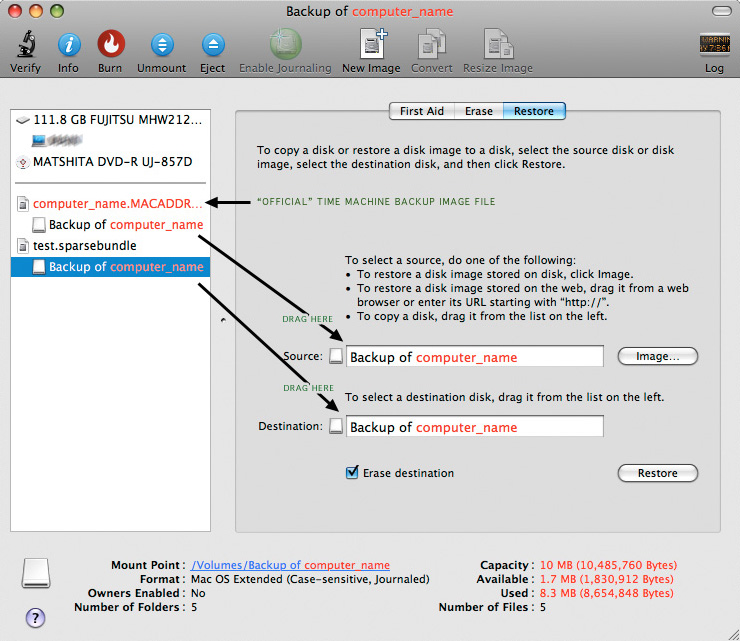
If you’ve done everything correctly you should see both MyComputer_0a1b2c3d4e5f.sparsebundle (or whatever) and test.sparsebundle on the right, and both of them should show identical volumes under them (e.g. “Backup of MyComputer”)
Now click on the Restore tab and follow the instructions on the picture.
Make sure Erase destination is checked and click Restore.
What it will do now is clone every block of data from MyComputer_0a1b2c3d4e5f.sparsebundle to test.sparsebundle. So recall the IF/ELSE section; if you had a large backup file this would take quite a while. And if you’re starting from scratch , it would be better to just let it end with an incomplete (but small) image, so you can resume/complete the backup with the clone you’ve just made.
STEP 4: The Switcheroo
Once the Restore/Erase/cloning process is done. Close Disk Utility.app Unmount the two volumes.
Now rename test.sparsebundle to MyComputer_0a1b2c3d4e5f.sparsebundle and replace the latter with your now newly renamed file.
When everything’s ready… turn TM on again, and start backing up. If you did everything right, it should now use that new image you’ve made – with the benefit of having a maximum size limit 😉
Hope this helps.
//
If you want to play it safe, you can temporarily move the official TM backup image to a different location (or rename it). This is more prudent as you can delete it only after you’ve confirmed if the new image and TM are playing nice with each other, if not, you can always put the old one back 🙂
Notes
| ⇡1 | Or at least partition it without voiding your warranty. |
|---|